We are currently updating the articles for 1.09.0. Translated articles will need to be updated by their respective authors.
Difference between revisions of "Objectives Setup"
(Created page with "Category:EntitySetup ==Objectives Overview== No More Room in Hell uses a slightly unique system for having objective gameplay in its maps. The system may seem a little ...") |
m |
||
| (One intermediate revision by one other user not shown) | |||
| Line 3: | Line 3: | ||
==Objectives Overview== | ==Objectives Overview== | ||
| − | No More Room in Hell uses a slightly unique system for having objective gameplay in its maps. The system may seem a little complex at first but | + | No More Room in Hell uses a slightly unique system for having objective gameplay in its maps. The system may seem a little complex at first but is quite flexible. |
| + | {{TOC right}} | ||
| + | {{Note|Advanced hammer knowledge is required to setup an objectives system.}} | ||
| − | As a quick overview, objectives are split into both "objectives" and "anti-objectives." Because the objective path for any given round is randomly selected, the "anti" objectives are used when the corresponding "objective" is not chosen for a given round. | + | As a quick overview, objectives are split into both "''objectives''" and "''anti-objectives''." Because the objective path for any given round is randomly selected, the "anti" objectives are used when the corresponding "objective" is not chosen for a given round. |
| − | Objectives and Anti-Objectives are defined as visgroups inside of Hammer. Inside these visgroups will be all entities associated with that objective. Entities inside of the objective visgroups will only spawn if their objective is chosen for a round. | + | Objectives and Anti-Objectives are defined as visgroups inside of Hammer. Inside these visgroups will be all entities associated with that objective. Entities inside of the objective visgroups will only spawn if their objective is chosen for a round. |
| − | |||
| − | + | <small>'''Example:''' Using the graph below, if one round is 'insert_batteries', 'disable_electricity', 'close_shutter', 'Extraction', then all entities inside of the Anti-Objective visgroups for 'roll_barrel' and 'extinguish_fire' would spawn. The entities inside of the Objective visgroups for 'roll_barrel' and 'extinguish_fire' would NOT spawn.</small> | |
| − | + | ||
| − | + | [[File:Obj_tool4.png|500px]] | |
| − | |||
| − | + | Because Hammer likes to remove empty visgroups, initial setup of them is futile; this section will simply discuss the required layout of the visgroups. All objective visgroups must be children to one main visgroup named "Objectives". All anti-objective visgroups must be children to one main visgroup named "anti", which must be a child to the visgroup "Objectives". Anti-objective visgroups must also be named the same as their corresponding objective visgroup. | |
| − | + | ||
| + | <small>Image A-1: Objective visgroup layout.</small> | ||
| + | |||
| + | [[File:Obj_tool42.png]] | ||
| + | |||
| + | ==Objectives In Your Map== | ||
| + | |||
| + | 1. For each objective (''but NOT for anti objectives!'') you need a '''[[nmrih_objective_boundary]]''' entity. These entities must be placed inside of the corresponding visgroups. This entity controls the beginning and end of objectives (hence the name 'boundary'). '''Only one boundary entity per objective!''' The name of the entity does not matter. The other options will be explained later. | ||
| + | |||
| + | |||
| + | <small>Image B-1: A nmrih_objective_boundary entity.</small> | ||
| + | |||
| + | [[File:Obj_boundary.png|100px]] | ||
2. Fill out your other entities as desired. All entities related to an objective should be placed inside that objective's visgroup. This will ensure that they will only spawn if the objective is chosen. | 2. Fill out your other entities as desired. All entities related to an objective should be placed inside that objective's visgroup. This will ensure that they will only spawn if the objective is chosen. | ||
| − | + | ||
| − | + | <small>Image B-2: Objective entities inside an objective visgroup.</small> | |
| + | |||
| + | [[File:obj_entities.png|500px]] | ||
3. For objective setup, use the boundary's '''OnObjectiveBegin''' output. For objective tear down, use the '''OnObjectiveEnd''' output. These are called when the individual objective begins and ends, not the round. Use these for turning on and off lights, enabling and disabling triggers, etc. | 3. For objective setup, use the boundary's '''OnObjectiveBegin''' output. For objective tear down, use the '''OnObjectiveEnd''' output. These are called when the individual objective begins and ends, not the round. Use these for turning on and off lights, enabling and disabling triggers, etc. | ||
| − | |||
| − | |||
| + | <small>Image B-3: Objective boundary outputs.</small> | ||
| − | + | [[File:Obj_outputs.png|500px]] | |
| − | |||
| − | |||
| + | 4. In order to signal objective completion, use the boundary's '''ObjectiveComplete''' input. To signal objective failure, use the boundary's '''ObjectiveFailed''' input. In order to signal objective completion and immediately go to extraction, use the boundary's '''ObjectiveCompleteTriggerExtraction''' input with a parameter override of the '''[[nmrih_extract_point]]''' entity to use. | ||
| − | |||
| + | <small>Image B-4: Objective boundary inputs.</small> | ||
| − | + | [[File:Obj_inputs.png|500px]] | |
| − | |||
| − | |||
| + | ''That's it for hammer! Make sure all objective visgroups are ENABLED when compiling. The next step is outside of Hammer, and into the graph editor.'' | ||
| − | |||
| − | + | ==Objective Graph Editor== | |
| − | + | ||
| − | + | 1. Inside the ''utils'' folder in the NMRiH build you will find '''NMRObjective.exe'''. Run this. The first time you start up, it will ask you for the location of your NMRiH ''maps'' directory (where the BSPs are stored). This tool will be used to link your objectives to one another. | |
| − | |||
| − | |||
| + | <small>Image C-1 Objective tool.</small> | ||
| − | + | [[File:obj_tool1.png|500px]] | |
| − | |||
| − | |||
| + | 2. Click on the folder icon to open your VMF. A couple of coloured blocks will appear on the screen, corresponding to your objectives and extraction points. | ||
| − | |||
| + | <small>Image C-2 Objectives and Extraction Points.</small> | ||
| − | + | [[File:Obj_tool2.png|500px]] | |
| − | + | 3. Click and drag these blocks around to position them in a logical layout (position is only cosmetic and has no effect on the game). To select multiple objectives, hold '''CTRL'''. In order to link one objective to the next, '''RIGHT CLICK''' on an objective, '''DRAG''' the mouse to the next objective, and release. In order to unlink two objectives, select them both using '''CTRL''' and click the 'Unlink' button. | |
| − | + | <small>Image C-3: Two linked objectives. Line thickness signifies direction. Thin -> Thick : First -> Second.</small> | |
| + | [[File:Obj_tool3.png|500px]] | ||
| − | + | ||
| + | 4. Continue doing this until you have your objectives linked however you like. Keep in mind that extraction zones are the end of the round -- they will not continue on to other objectives. | ||
| + | |||
| + | |||
| + | <small>Image C-4: Fully linked objectives.</small> | ||
| + | |||
| + | [[File:obj_tool4.png|500px]] | ||
| + | |||
| + | |||
| + | 5. You can name each objective by clicking on its block and filling in the "Description" field on the bottom of the screen. | ||
| + | |||
| + | |||
| + | 6. All objectives that do not have a link leading into them will be considered as the starting objective for each round. In the example above, ''insert_batteries'' and ''roll_barrel'' are candidates for starting objectives. Round will finish after extraction or the final objective in a chain if it does not lead anywhere. | ||
| + | |||
| + | |||
| + | 7. When you are all finished, click the Save button. This will save a '''.NMO''' file in your maps directory, as well as a '''.NMOS''' file in the same directory as your VMF. The '''.NMOS''' file will preserve your layout the next time you open that VMF in the objective tool. | ||
| + | |||
| + | |||
| + | ''You are all set! The next time you load up your map in NMRiH, you should be able to play your new objectives.'' | ||
| + | |||
| + | |||
| + | ==Adding Some Flare To Your Objectives== | ||
The '''nmrih_objective_boundary''' entity has properties for up to 10 "Glow Entities" and colours. For each entity that you want to glow, put the entity's targetname in the 'Glow Entity Name' field and the colour that you want it to glow in the 'Glow Entity Colour' field. When this objective becomes active, the named objectives will all appear with a glow when players are within a certain distance. | The '''nmrih_objective_boundary''' entity has properties for up to 10 "Glow Entities" and colours. For each entity that you want to glow, put the entity's targetname in the 'Glow Entity Name' field and the colour that you want it to glow in the 'Glow Entity Colour' field. When this objective becomes active, the named objectives will all appear with a glow when players are within a certain distance. | ||
| − | + | ||
| − | + | <small>Image D-1 Glowing entities.</small> | |
| + | |||
| + | [[File:Gaussian_blur_take2.png|500px]] | ||
==Notes== | ==Notes== | ||
* Brushes cannot be made part of objective visgroups. If you would like to have changeable walls, use a '''func_door''' | * Brushes cannot be made part of objective visgroups. If you would like to have changeable walls, use a '''func_door''' | ||
| − | * An example .vmf containing sample objectives is located | + | * An example .vmf containing sample objectives is located [http://dl.dropbox.com/u/907542/NMRiH/example%20objective%20%2B%20vmf.zip here]. |
Latest revision as of 22:44, 14 September 2021
Objectives Overview
No More Room in Hell uses a slightly unique system for having objective gameplay in its maps. The system may seem a little complex at first but is quite flexible.
As a quick overview, objectives are split into both "objectives" and "anti-objectives." Because the objective path for any given round is randomly selected, the "anti" objectives are used when the corresponding "objective" is not chosen for a given round.
Objectives and Anti-Objectives are defined as visgroups inside of Hammer. Inside these visgroups will be all entities associated with that objective. Entities inside of the objective visgroups will only spawn if their objective is chosen for a round.
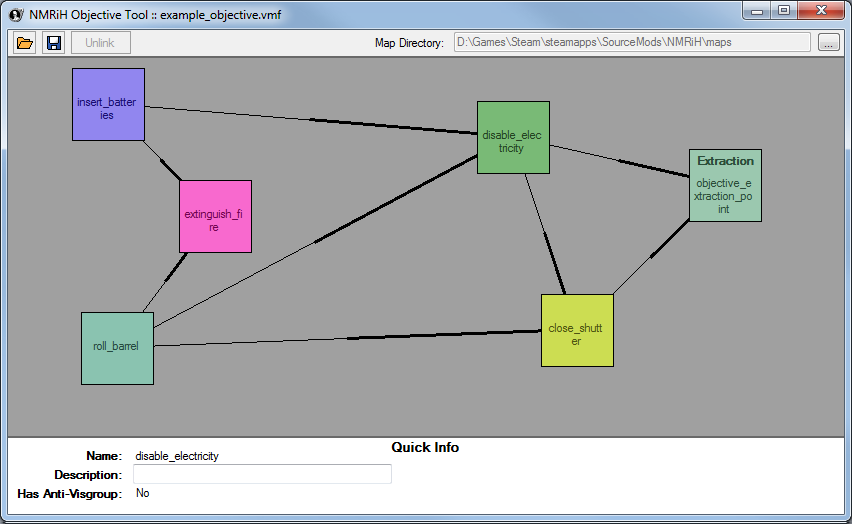
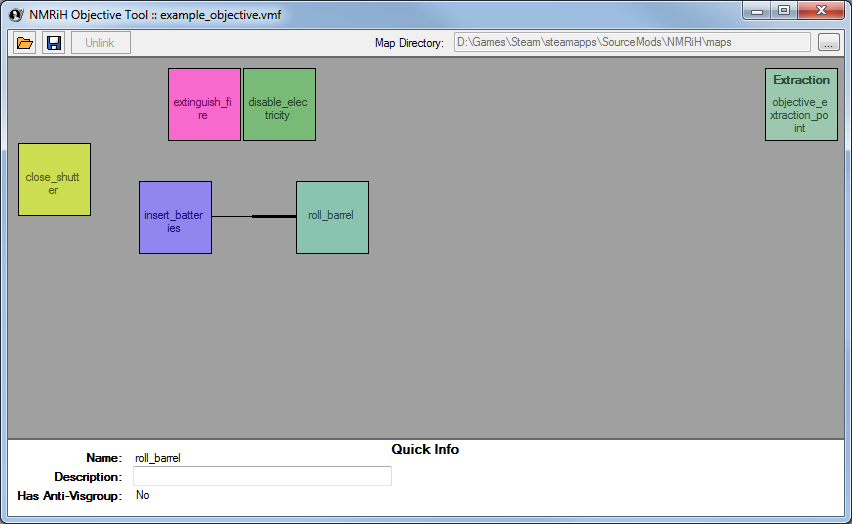
Example: Using the graph below, if one round is 'insert_batteries', 'disable_electricity', 'close_shutter', 'Extraction', then all entities inside of the Anti-Objective visgroups for 'roll_barrel' and 'extinguish_fire' would spawn. The entities inside of the Objective visgroups for 'roll_barrel' and 'extinguish_fire' would NOT spawn.
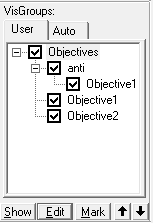
Because Hammer likes to remove empty visgroups, initial setup of them is futile; this section will simply discuss the required layout of the visgroups. All objective visgroups must be children to one main visgroup named "Objectives". All anti-objective visgroups must be children to one main visgroup named "anti", which must be a child to the visgroup "Objectives". Anti-objective visgroups must also be named the same as their corresponding objective visgroup.
Image A-1: Objective visgroup layout.
Objectives In Your Map
1. For each objective (but NOT for anti objectives!) you need a nmrih_objective_boundary entity. These entities must be placed inside of the corresponding visgroups. This entity controls the beginning and end of objectives (hence the name 'boundary'). Only one boundary entity per objective! The name of the entity does not matter. The other options will be explained later.
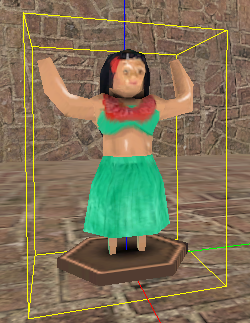
Image B-1: A nmrih_objective_boundary entity.
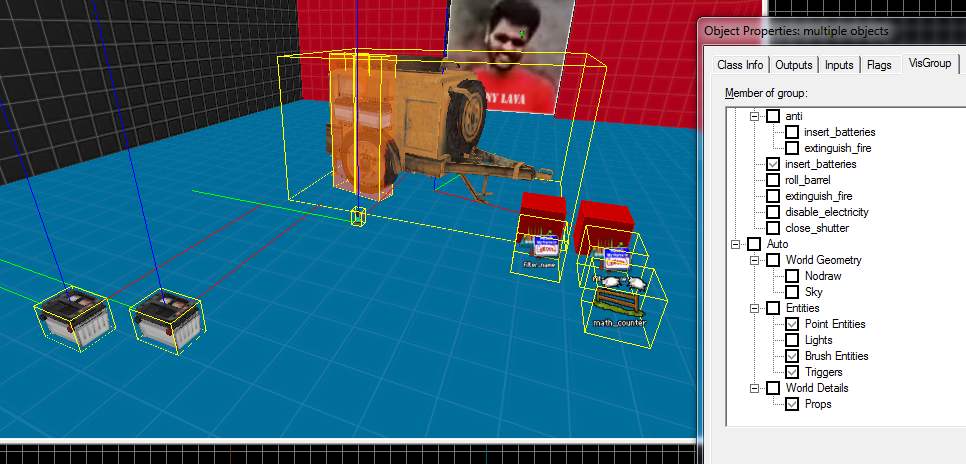
2. Fill out your other entities as desired. All entities related to an objective should be placed inside that objective's visgroup. This will ensure that they will only spawn if the objective is chosen.
Image B-2: Objective entities inside an objective visgroup.
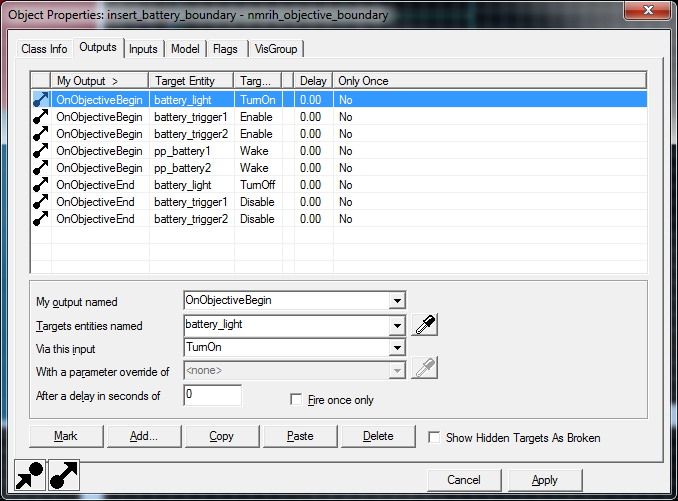
3. For objective setup, use the boundary's OnObjectiveBegin output. For objective tear down, use the OnObjectiveEnd output. These are called when the individual objective begins and ends, not the round. Use these for turning on and off lights, enabling and disabling triggers, etc.
Image B-3: Objective boundary outputs.
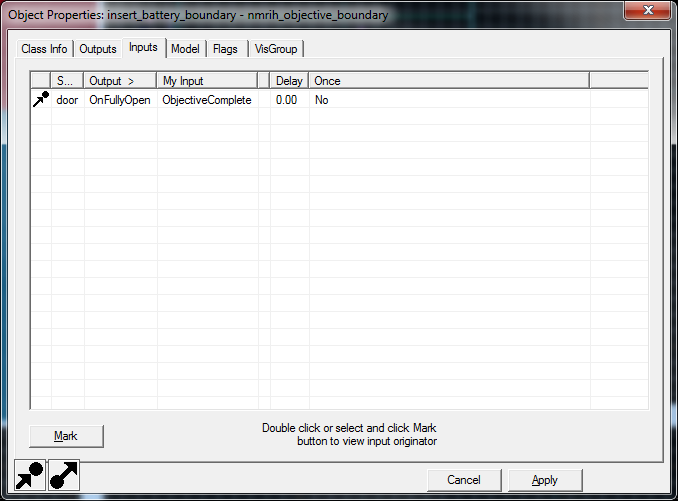
4. In order to signal objective completion, use the boundary's ObjectiveComplete input. To signal objective failure, use the boundary's ObjectiveFailed input. In order to signal objective completion and immediately go to extraction, use the boundary's ObjectiveCompleteTriggerExtraction input with a parameter override of the nmrih_extract_point entity to use.
Image B-4: Objective boundary inputs.
That's it for hammer! Make sure all objective visgroups are ENABLED when compiling. The next step is outside of Hammer, and into the graph editor.
Objective Graph Editor
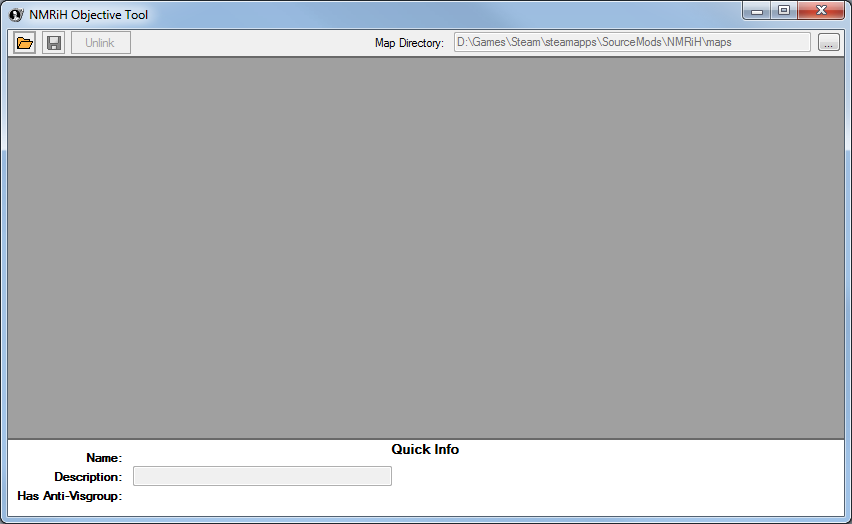
1. Inside the utils folder in the NMRiH build you will find NMRObjective.exe. Run this. The first time you start up, it will ask you for the location of your NMRiH maps directory (where the BSPs are stored). This tool will be used to link your objectives to one another.
Image C-1 Objective tool.
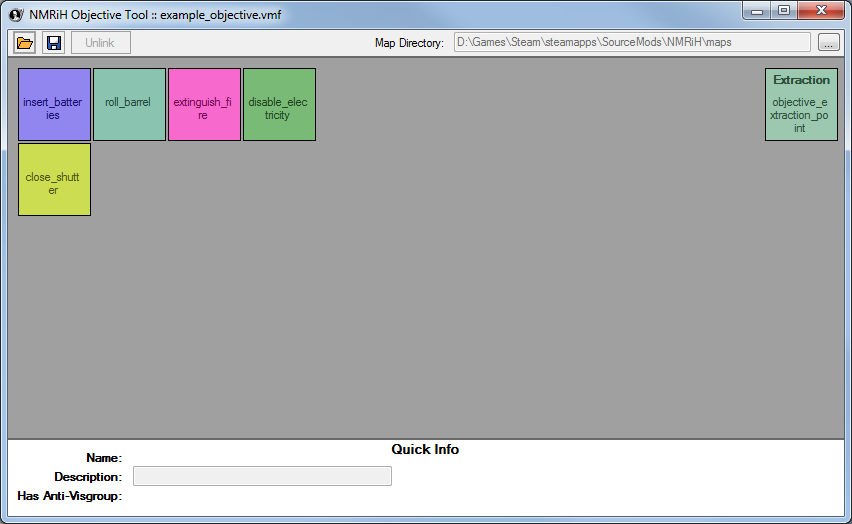
2. Click on the folder icon to open your VMF. A couple of coloured blocks will appear on the screen, corresponding to your objectives and extraction points.
Image C-2 Objectives and Extraction Points.
3. Click and drag these blocks around to position them in a logical layout (position is only cosmetic and has no effect on the game). To select multiple objectives, hold CTRL. In order to link one objective to the next, RIGHT CLICK on an objective, DRAG the mouse to the next objective, and release. In order to unlink two objectives, select them both using CTRL and click the 'Unlink' button.
Image C-3: Two linked objectives. Line thickness signifies direction. Thin -> Thick : First -> Second.
4. Continue doing this until you have your objectives linked however you like. Keep in mind that extraction zones are the end of the round -- they will not continue on to other objectives.
Image C-4: Fully linked objectives.
5. You can name each objective by clicking on its block and filling in the "Description" field on the bottom of the screen.
6. All objectives that do not have a link leading into them will be considered as the starting objective for each round. In the example above, insert_batteries and roll_barrel are candidates for starting objectives. Round will finish after extraction or the final objective in a chain if it does not lead anywhere.
7. When you are all finished, click the Save button. This will save a .NMO file in your maps directory, as well as a .NMOS file in the same directory as your VMF. The .NMOS file will preserve your layout the next time you open that VMF in the objective tool.
You are all set! The next time you load up your map in NMRiH, you should be able to play your new objectives.
Adding Some Flare To Your Objectives
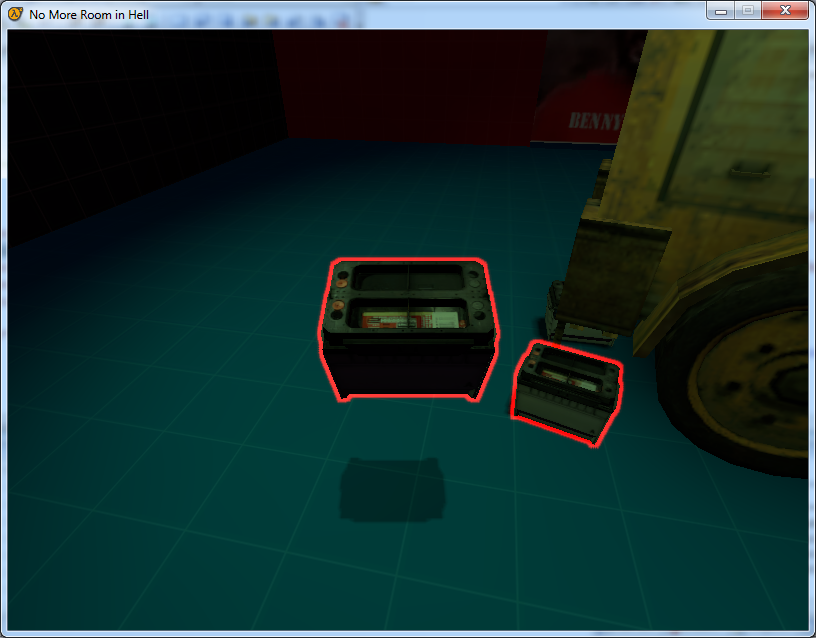
The nmrih_objective_boundary entity has properties for up to 10 "Glow Entities" and colours. For each entity that you want to glow, put the entity's targetname in the 'Glow Entity Name' field and the colour that you want it to glow in the 'Glow Entity Colour' field. When this objective becomes active, the named objectives will all appear with a glow when players are within a certain distance.
Image D-1 Glowing entities.
Notes
- Brushes cannot be made part of objective visgroups. If you would like to have changeable walls, use a func_door
- An example .vmf containing sample objectives is located here.
